Summary
The article explains how to enable and use Windows Live Captions, including downloading the feature, turning on microphone audio to caption your own speech, and launching it with a keyboard shortcut. It also describes how to customize caption placement, size, and visual style to improve readability and fit different accessibility or multitasking needs.
Body
Get live captions of spoken audio on PC
Step 1 - Download this file (https://www.microsoft.com/store/productId/9PF3QC8DVGVD?ocid=libraryshare)
Step 2 - Once downloaded press Windows logo key + Ctrl + L.
Step 3 - To caption your own speech:
-
Select the Settings button in the live captions window.
-
Select Preferences and turn on the Include microphone audio option. When you turn on live captions, this functionality is off by default.
Personalize how your captions are displayed
To choose where captions are displayed on your desktop:
-
Select the Settings button in the live captions window.
-
Select Position.
-
Choose either Above screen, Below screen, or Overlaid on screen.
-
When you choose Above screen or Below screen, the captions window will appear as docked to the top or bottom screen edges in reserved space on your desktop, and other apps will not be blocked by the captions window. When docked to the top, you might find that live captions works well while sharing video in a virtual meeting or conversation, whereas in other cases, such as viewing videos, docking to bottom might work best.
-
When you choose Floating on screen, live captions will appear in an overlay window which you can reposition as needed to avoid obscuring other apps in use.
To show more lines of text in the captions window, increase the window size by using the mouse, touch, or keyboard.
Make captions easier to read
-
Select the Settings button in the live captions window.
-
Select Preferences.
-
Select Caption style. The Accessibility settings for Captions opens.
-
Under Caption style, do one of the following:
-
Select a built-in style from the dropdown menu. Use the Default built-in style to have captions displayed with colors appropriate to your device’s dark or light mode setting in Settings > Personalization > Colors > Choose your mode.
-
Select the Edit button to create a custom style that works best for you.
Get live captions of spoken audio on Mac
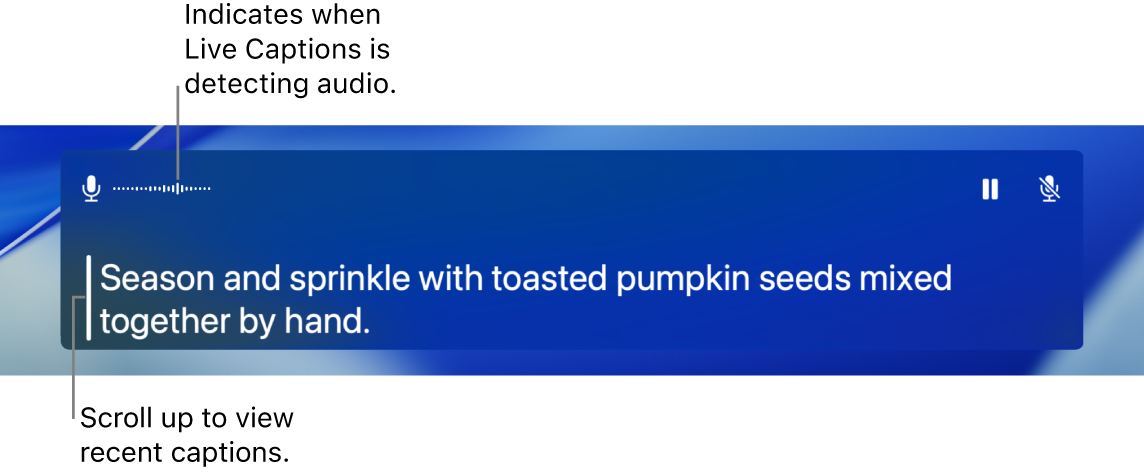
Live Captions gives you a real-time transcription of spoken audio—allowing you to easily follow the audio in any app, such as FaceTime or Podcasts, as well as live conversations around you. Audio is processed on device.
Note: Live Captions is available only on Mac computers with Apple silicon and is not available in all languages, countries, or regions; see macOS Feature Availability for more information. The accuracy of Live Captions may vary and should not be relied upon in high-risk or emergency situations.
Turn Live Captions on or off
-
On your Mac, choose Apple menu  > System Settings, click Accessibility
  in the sidebar, then click Live Captions. (You may need to scroll down.)
-
Turn Live Captions on or off.
The Live Captions window appears on the screen but is automatically hidden if no audio is detected. If you want the Live Captions window to always be visible on the screen, click  in the menu bar, then choose Keep Onscreen.
Note: The first time you turn on Live Captions, language data is downloaded to your Mac. You must be connected to the internet.
By default, Live Captions transcribes audio from all apps. If you want to use Live Captions only in FaceTime, see Turn on Live Captions in FaceTime.
Use Live Captions
When you turn on Live Captions on your Mac, audio is transcribed in real time in the Live Captions window.
You can pause captioning at any time, without turning Live Captions off. Do one of the following:
-
Click  in the Live Captions window. Click
  to restart captioning.
-
Click in the menu bar, then choose Stop Live Captions. Choose Start Live Captions to resume captioning.
If you use VoiceOver and a braille display, when Live Captions is turned on, you can access the Live Captions window from the System Dialogs menu in the Application Chooser. See Use Live Captions with a braille display.
Have what you type spoken out loud
While in a conversation—in person or during a call—your Mac can speak what you type.
-
In the Live Captions window on your Mac, click the Type to Speak field, enter what you want to say, then press the Return key.
To indicate that your text is being read out loud, a message is shown in the top-left corner of the Live Captions window.
Note: If you don’t see the Type to Speak text field, click in the menu bar, then choose Type to Speak.
If you’re unable to speak or have lost your speech over time, you can also use Live Speech to have what you type spoken out loud in one of dozens of system voices or a Personal Voice you create.
Change what audio is captioned
When you use Live Captions, you can switch between captioning the audio coming out of your Mac and the sound picked up by the computer’s microphone (such as during an in-person conversation).
Do one of the following:
-
Click  in the top-right corner of the Live Captions window to switch between your Mac computer’s audio output and its microphone audio input.
-
Click in the menu bar, then choose Computer Audio or Microphone.
Customize the appearance of captions
-
On your Mac, choose Apple menu > System Settings, click Accessibility in the sidebar, then click Live Captions. (You may need to scroll down.)
-
Change any of the following:
-
Font family: Change the font used in captions.
-
Font size: Increase or decrease the text size used in captions.
-
Font color: Change the text color used in captions
-
Background color: Change the background color of the Live Captions window.
You can resize the Live Captions window by dragging any edge, and change its position on the screen. To restore the window to its default size and position, click in the menu bar, then choose Restore Default Position.
You can also set an option to always show the Live Captions window, even when no audio is detected. Click in the menu bar, then choose Keep Onscreen.
You can use Accessibility Shortcuts to quickly turn Live Captions on or off.
You can also use keyboard shortcuts for many Live Captions actions, such as turning them on or off and changing the audio source. To view and customize available shortcuts, choose Apple menu > System Settings, click Keyboard  in the sidebar (you may need to scroll down), click Keyboard Shortcuts, then click Accessibility. See Use macOS keyboard shortcuts.